September 28, 2021
Post questions to the Moodle Forum!
Your job in this programming project is to write the classic arcade game of Breakout, which was invented by Steve Wozniak before he founded Apple with Steve Jobs. It’s a bigger program than the previous two labs, but this writeup and comments in the starter code will help guide you through it. In addition to dealing with a larger amount of code, this lab is designed to help you practice
for loops and if statementsYou will need to download the following files to do this homework: breakout.py, and pgl.py. breakout.py contains the starter code for this lab and you will modify this file to implement your Breakout game. pgl.py is the Portable Graphics Library (PGL) file that provides the 2D graphics we’re using 1. This file needs to be in the same folder as breakout.py. The PGL documentation is here
Suggested timeline:
The problems marked (CHALLENGE) are a way to go above and beyond what is expected for a lab. Only attempt them after you are completely finished with all other parts of the lab. Completing all the non-challenge components of a lab will earn 28.5/30 (95%, an A). Earning challenge points can result in a grade higher than 100%.
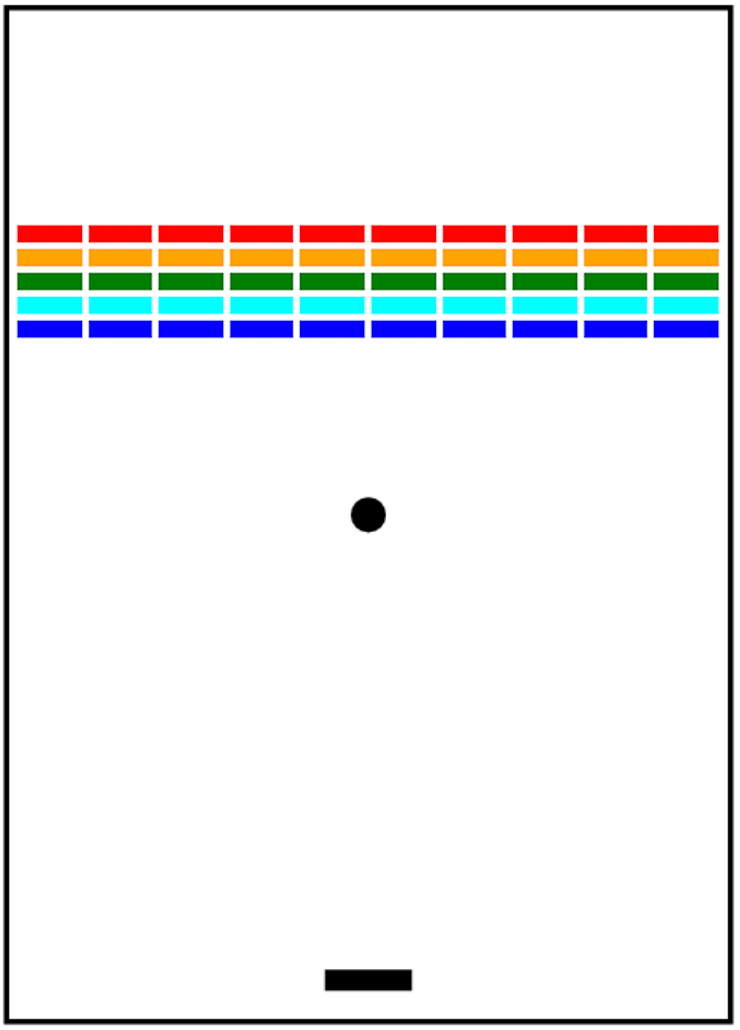
In Breakout, the initial state of the world appears in Figure 1 on the right. The colored rectangles in the top part of the screen are bricks, and the slightly larger rectangle at the bottom is the paddle. The paddle is in a fixed position in the vertical dimension, but moves back and forth across the screen along with the mouse until it reaches the edges of the window.
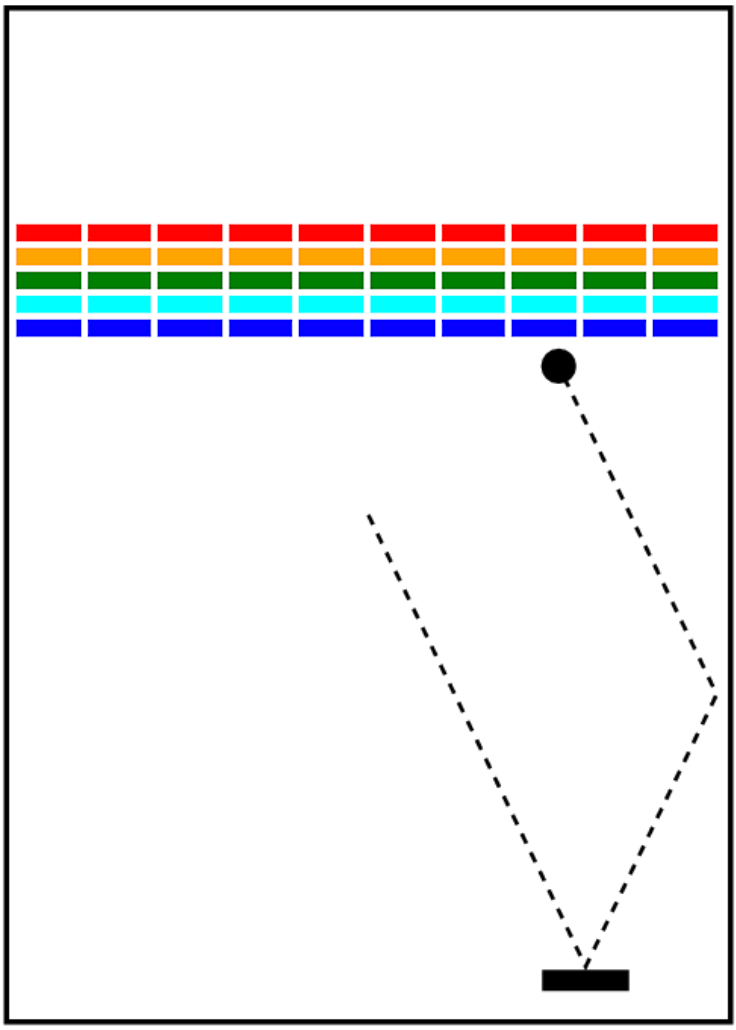
A complete game consists of three turns. On each turn, a ball is launched from the center of the window toward the bottom of the screen at a random angle. The ball bounces off the paddle and the walls of the world. Thus, after two bounces—one off the paddle and one off the right wall—the ball might have the trajectory shown in Figure 2. (Note that the dotted line is there only to show the ball’s path and does not actually appear on the screen.)
As you can see from Figure 2, the ball is about to collide with one of the bricks on the bottom row.
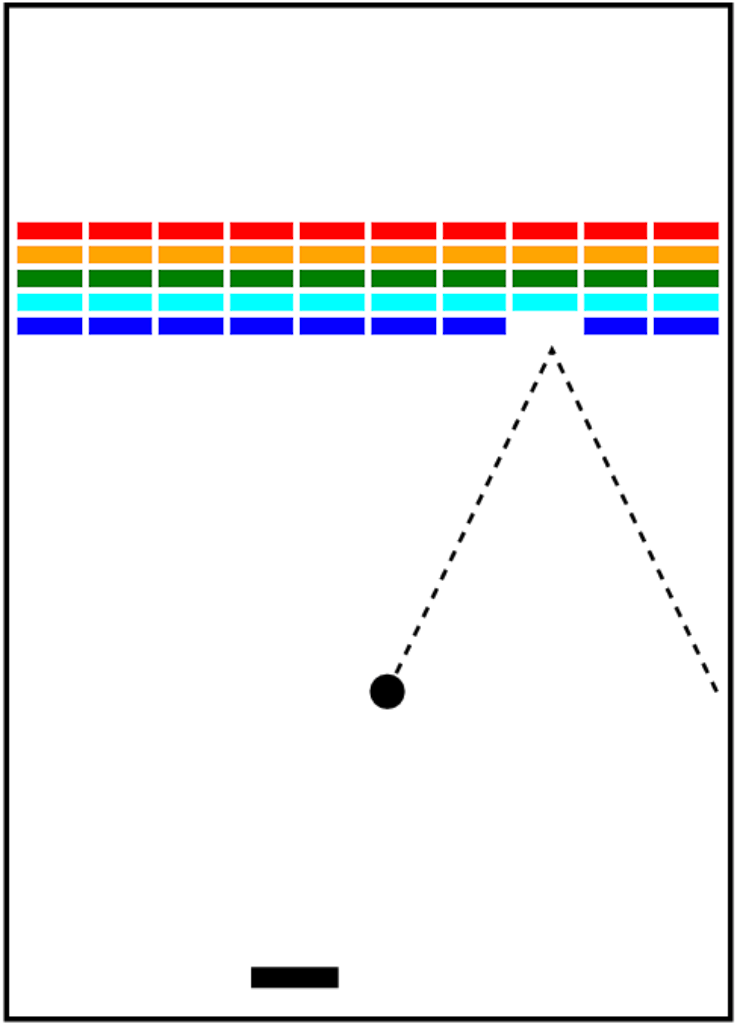
When that happens, the ball bounces just as it does on any other collision, but the brick disappears. Figure 3 shows what the game looks like after that collision and after the player has moved the paddle to put it in line with the oncoming ball.
The play on a turn continues in this way until one of two conditions occurs:
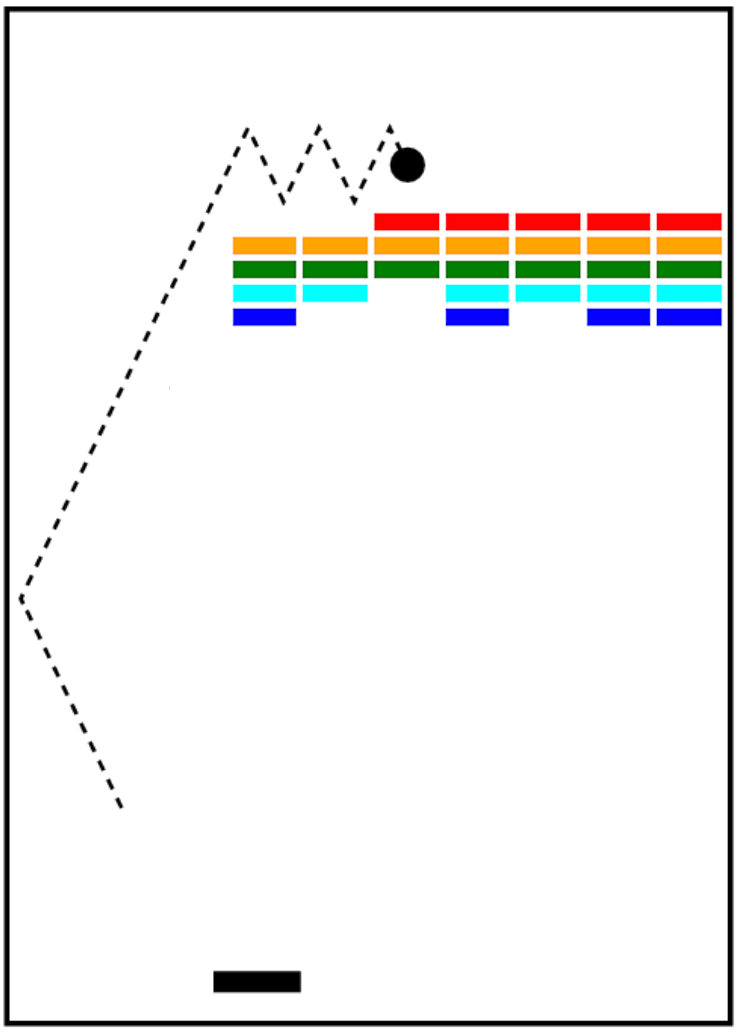
After all the bricks in a particular column have been cleared, a path will open to the top wall. When this delightful situation occurs, the ball will often bounce back and forth several times between the top wall and the upper line of bricks without the user ever having to worry about hitting the ball with the paddle. This condition is a reward for “breaking out” and gives meaning to the name of the game. Figure 4 shows the situation shortly after the ball has broken through the wall. That ball will go on to clear several more bricks before it comes back down the open channel.
It is important to note that, even though breaking out is a very exciting part of the player’s experience, you don’t have to do anything special in your program to make it happen. The game is simply operating by the same rules it always applies: bouncing off walls and the paddle and clearing bricks.
The starter file for this project, breakout.py, contains an incomplete version of the final game. This file takes care of the following details:
breakout function that creates the graphics window. Your job is to add the code for the Breakout game including the definitions of the the helper and callback functions update_paddle, update_ball, and check_collision. There are comments throughout to guide you through the code you need to write.breakout function when you run breakout.py.Success in this project will depend on working through it methodically piece by piece, getting each step working before you move on to the next. The next few sections describe a reasonable step-by-step approach to the problem.
The first step is to create the paddle. Assign a variable to a new GRect object with code like
paddle = GRect(...)As the documentation indicates, inside the parentheses after GRect we need to provide four arguments corresponding to the rectangle’s position (x and y) and dimensions (width, height). Remember that the origin (i.e., position (0, 0)) is in the upper left corner of the winder and that the position we provide to GRect is the location of the rectangle’s upper left corner. Note the the paddle’s y-position, width, and height are among the constants computed by the starter code. All that’s missing is the initial x position. You can just use 0, as we’re about to make the paddle’s x-position follow the mouse.
We also need to give the paddle the right appearance—solid black—and add it to the graphics window so that it shows up. Do that by adding code like this:
paddle.setFilled(True)
paddle.setColor("Black")
gw.add(paddle)
The last part of creating the paddle is to make it follow the mouse. Part of this has already been done, but you need to finish the function that updates the paddle’s position every time the mouse moves (update_paddle). The paddle’s y-position is fixed (it should always be PADDLE_Y), so we only need to take into account the x-position of the mouse (e.getX() inside update_paddle). The wrinkle is that we don’t want the paddle to be able to go off the sides of the screen. You’ll need to add a check to see whether the x coordinate of the mouse would make the paddle extend beyond the boundary and change that x coordinate if necessary to ensure that the entire paddle is visible in the window.
Test your code at this point to make sure your paddle has the correct position, appearance, and response to mouse movement.
The first part of this is fairly similar to creating the paddle. The ball should be a GOval, which again takes x, y, width and height. Use the GWINDOW_WIDTH, GWINDOW_HEIGHT and BALL_SIZE constants to place an appropriately-sized solid black circle in the middle of the window. Keep in mind the coordinates you specify for the GOval are its upper left corner, not its center. Assign the GOval to a variable, and remember to add it to the graphics window. Test your code to check your work.
Now for the interesting part: making the ball move and bounce. You will do this by assigning values to game_state.ball_x_vel and game_state.ball_y_vel in the same place where you create the ball and then using those values inside the update_ball function. In terms of assigning the x- and y-velocities, the ball should initially be heading downward, and you might try a starting value of 2.0 for ball_y_vel, which is included in the constants as INITIAL_Y_VELOCITY (recall that positive-y is down since the origin is in the upper left).
The game would be boring if every ball took the same course, so you should choose the ball_x_vel component randomly. My recommended approach is to use random.uniform(MIN_X_VELOCITY, MAX_X_VELOCITY) to get a random magnitude for the velocity and then flip a coin to choose a direction. That is, assign game_state.ball_x_vel to random.uniform(MIN_X_VELOCITY, MAX_X_VELOCITY) and then make it negative (i.e., game_state.ball_x_vel = -game_state.ball_x_vel) with a 50% chance. This strategy gives better results than just using random.uniform(-MAX_X_VELOCITY, MAX_X_VELOCITY), which might generate a ball going more or less straight down. That would make life far too easy for the player.
With the velocities set, turn your attention to the update_ball function. First thing is the make the ball move according to game_state.ball_x_vel and game_state.ball_y_vel (you can do this with object.move(delta_x, delta_y), which moves whatever object is by delta_x in the x direction and delta_y in the y direction).
The starter code sets up the game so it won’t start until the user clicks the mouse. Test your code now to make sure that it moves down once you click the mouse. Once you’ve gotten the ball moving, your next challenge is to get it to bounce around the world, ignoring, at least for the moment, the paddle. To do so, you need to check to see if the coordinates of the ball have moved outside the window. Thus, to see if the ball has bounced off the right wall, you need to see whether the coordinate of the right edge of the ball has become greater than the width of the window; the other three directions are treated similarly. You can use ball.getX() and ball.getY() to get the coordinates of the upper-left corner of the ball. For now, have the ball bounce off the bottom wall so that you can watch it make its path around the world. You can change that test later so that hitting the bottom wall signifies the end of a turn.
Computing what happens after a bounce is extremely simple. If a ball bounces off the top or bottom wall, all you need to do is reverse the sign of game_state.ball_y_vel. Symmetrically, bouncing off the side walls reverses the sign of game_state.ball_x_vel. Test your code again to make sure the ball bounces correctly off all four walls.
The bricks will be GRects like the paddle. The number, dimensions, colors, and spacing of the bricks are specified using constants in the starter file, as is the distance from the top of the window to the first line of bricks. The only value you need to compute is the x coordinate of the first column, which should be chosen so that the bricks are centered in the window, with the leftover space divided equally on the left and right sides. Each row of bricks should use a different color following the sequence in BRICK_COLORS. If you change the definition of N_ROWS in the starter file, any additional rows should simply repeat this sequence, starting over from “Red” (the modulo operator, %, will be useful in achieving this). You will want to use nested for loops to handle creating this 2D grid of objects. Remember to fill and color each brick as you create it and add it the graphics window.
Test your code and make sure your bricks match the pictures at the top of this writeup before moving on.
In order to make Breakout into a real game, you have to be able to tell whether the ball is colliding with another object in the window. As scientists often do, it helps to begin by making a simplifying assumption and then relaxing that assumption later. Suppose the ball were a single point rather than a circle. In that case, how could you tell whether it had collided with another object?
If you look through the PGL documentation for the GWindow class, you will discover that there is a method getElementAt(x, y) that takes a location in the window and returns the graphical object at that location, if any. If there are no graphical objects that cover that position, getElementAt returns the value None. If there is more than one, getElementAt always chooses the one closest to the top of the stacking order, which is the one that appears to be in front on the display.
So far, so good. But, unfortunately, the ball is not a single point. It occupies physical area and therefore may collide with something on the screen even though its center does not. The easiest thing to do—which is in fact typical of the simplifying assumptions made in real computer games—is to check a few carefully chosen points on the outside of the ball and see whether any of those points has collided with anything. As soon as you find something at one of those points, you can declare that the ball has collided with that object.
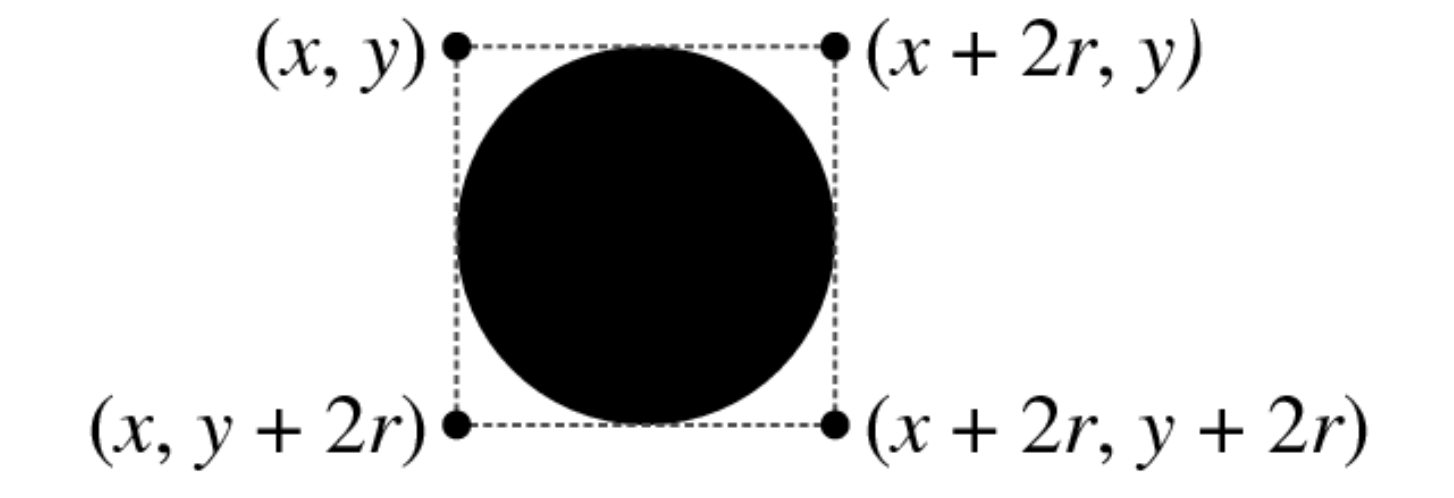
In your implementation, the easiest thing to do is to check the four corner points on the square in which the ball is inscribed. Remember that a GOval is defined in terms of its bounding rectangle, so that if the upper left corner of the ball is at the point (\(x\), \(y\)), the other corners will be at the locations shown in this diagram:
These points have the advantage of being outside the ball—which means that getElementAt can’t return the ball itself—but nonetheless close enough to make it appear that collisions have occurred. Thus, for each of these four points, you need to:
getElementAt on that location to see whether anything is there.None, then you need look no further and can take that value as the GObject with which the collision occurred.getElementAt returns None for a particular corner, go on and try the next corner.It would be very useful to separate this part of the program into a separate function that returns the GObject colliding with the ball, if any, and None otherwise. In fact, the starter code has done this with the incomplete check_collision function. The check for collision with the upper left corner is already taken care of, so you need to fill in the code for the other three. check_collision is called inside update_ball using
collider = check_collision(ball.getX(), ball.getY())From here, the only remaining thing you need to do is decide what to do when a collision occurs. There are only two possibilities. First, the object you get back might be the paddle, which you can test simply by checking whether collider is equal to paddle (or whatever you called the variable for the paddle in Step 2).
If the colliding object is the paddle, you need to bounce the ball so that it starts traveling up. If it isn’t the paddle, the only other thing it might be is a brick, since those are the only other objects in the world. Once again, you need to cause a bounce in the vertical direction, but you also need to take the brick away. To do so, all you need to do is remove it from the screen by calling the remove method on the GWindow object and passing it the colliding brick. Remember to update game_state.num_bricks.
If you’ve gotten to here, you’ve done all the hard parts. There are, however, a few more details you need to take into account: - You have to take care of the case when the ball hits the bottom wall. In the prototype you’ve been building, the ball just bounces off this wall like all the others, but that makes the game impossible to lose. You’ve got to modify update_ball so that it tests for hitting the bottom wall and either resets the ball’s position and velocity (if there are balls left) or ends the game. - You have to check for the other terminating condition, which is hitting the last brick. Provided you’re updating game_state.num_bricks appropriately when bricks are added and removed, it makes for a nice way to check if all the bricks are gone. - You’ve got to test your program to see that it works. Play for a while and make sure that all the parts of it are working.
Play around with any or all of these challenges if you find yourself with extra time. There are a lot of different ways you could extend the game!
Fix the way the ball can get “glued” to the paddle. To see this behavior, just before the ball is going to pass the paddle level, move the paddle quickly so that the paddle collides with the ball rather than vice-versa. The ball likely behaves very strangely when this occurs. Try to understand why this occurs and improve your code so that it (at least mostly) doesn’t happen.
Add messages. Use Glabel objects to display the player’s remaining lives and whether they have won or lost when the game ends.
Improve the user control over bounces. It would be interesting if the player could control the ball by hitting it with different parts of the paddle. In the old arcade game, the ball would bounce in both the x and y directions if you hit it on the edge of the paddle from which the ball was coming.
Have the ball speed up the longer the game goes. The arcade version of Breakout lured you in by starting off slowly. But, as soon as you thought you were getting the hang of things, the program sped up, making life just a bit more exciting.
Keep score. You could keep score, generating points for each brick. In the arcade game, bricks were more valuable higher up in the array, so that you got more points for red bricks than for blue ones.
What else would you want a game like this to do?
This is definitely a program you want to test bit by bit as you go along. In this case, testing means running your program and checking that the game has the behavior you expect it to. If something isn’t working, print statements are your friend.
I highly recommend completing the lab in the order laid out in this writeup. Pay attention to where the writeup suggests testing your code—bugs will be much harder to find if you’re debugging all six steps at once instead of making sure each one works before moving on. Read the comments in breakout.py very carefully as well.
If you have time, you can also test whether your code uses the provided constants correctly (part of the grading) by changing their values and observing whether the appearance or behavior or your program changes appropriately. For example, changing N_ROWS or N_COLS should change the number of bricks that appear (and potentially the size of the bricks and other objects). Others worth testing: TOP_FRACTION, N_BALLS, INITIAL_Y_VELOCITY, MIN_X_VELOCITY, MAX_X_VELOCITY, and BRICK_COLORS.
Submit the following files via the Lab 2 Moodle page. Only one partner needs to submit.
Your modified breakout.py
If you did any CHALLENGES, submit a file called challenges.txt describing what you did
This assignment is graded out of 30 points as follows:
= and operators (>, or, etc.) – 1 point.py file you submit – 0.5 pointsCorrectness points are assessed by playing your game and checking that it works correctly. We will also change the provide constants and check that your game responds as expected. If you submit code that crashes, we will attempt to fix any issues and re-grade. You will lose points for each issue we need to fix.
Style points are assessed by us reading your code.
Acknowledgments: this lab adapted from Eric Robert’s Breakout lab.
PGL was created by Eric Roberts and Keith Schwarz at Stanford University (see citation below). Python implementation (v0.89) and the associated documentation retrieved from Roberts’ Spring 2020 offering of CSCI 121 at Reed College
Roberts, Eric, and Keith Schwarz. “A portable graphics library for introductory CS.” Proceedings of the 18th ACM conference on Innovation and technology in computer science education. ACM, 2013.↩︎