enigma_main.py with the starter filesNovember 2, 2021
Post questions to the Moodle Forum!
Your task in this lab is to write a program that simulates the operation of the Enigma machine, which was used by the German military to encrypt messages during World War II. This writeup focuses on what you have to do to complete the assignment. Additional background on the Enigma machine—and how the codebreakers at Bletchley Park managed to break it—can be found in cryptography-background.pdf.
This lab will help you practice
To begin, download the starter files in lab7.zip and unzip them to their own folder. These files are
enigma_main.py: runs the simulation; you should not need to modify this fileenigma_constants.py: defines constants for both the visual appearance and cryptographic algorithm; you should not modify this fileenigma_machine.py: the starter file for the EnigmaMachine classenigma_key.py: the starter file for the EnigmaKey classenigma_lamp.py: the starter file for the EnigmaLamp classenigma_rotor.py: the starter file for the EnigmaRotor classutilities.py: four useful functions for creating nicely centered GOvals, GRects, and GLabelspgl.py: the Portable Graphics Library (PGL) file that provides the 2D graphics we’re using 1. You can find nicely formatted, but slightly outdated documentation here and messy, but up-to-date documentation hereenigma-top-view.png: an image of the Enigma Machine as viewed from the topWhen you run the enigma_main.py program as it appears in the starter files, it produces the screen display shown in Figure 1.
Sadly, even though the screen display shows the entire Enigma machine, that doesn’t mean that you’re finished with the lab. The display is simply a GImage that shows what the Enigma machine looks like when viewed from the top. The display produced by the starter program is completely inert. Your job is to make it interactive. You shouldn’t need to modify enigma_main.py, but it will be useful to read through it to make sure that you understand what it does. You need to make your modifications to the EnigmaMachine class and, as you move through the milestones, add the classes EnigmaKey, EnigmaLamp, and EnigmaRotor, each of which is responsible for modeling one component of the machine.
Please post your questions on the Moodle forum or bring them to class.
The first step on your way to implementing an interactive Enigma machine is to create the objects for the keyboard. To do this you’ll make use of the EnigmaKey class defined in enigma_key.py. It is a subclass of pgl’s GCompound class, which means that it contains other graphical objects and that you can add it to the window. Your task for this milestone is to add code to EnigmaMachine to create 26 EnigmaKey instances and add them to the GWindow.
Since cutting and pasting 26 copies of the same code is both tedious and error prone, you want to perform this operation using a loop that cycles through the letters from A to Z. The index variable of this loop should determine what letter is passed to the EnigmaKey constructor.
The task of creating the EnigmaKey objects is the responsibility of the EnigmaMachine constructor (in enigma_machine.py. After displaying the background image on the window (which is part of the starter code you were given), you will need to execute a loop that creates each of the 26 keys and then adds it to the GWindow. To do so, you need to know where each key belongs on the screen. There isn’t any magical way to figure out the location of each key; the only way to figure out where each key goes is to take out a ruler and measure the distance from the upper left corner of the image to the center of each key. But don’t panic. That’s already been done for you. enigma_constants.py includes a constant called KEY_LOCATIONS that specifies the x and y coordinates of the center of each key as a tuple containing the x and y coordinates. The definition of that constant begins with the lines
KEY_LOCATIONS = [
    (140, 566),    # A
    (471, 640),    # B
    (319, 639),    # C
    (294, 567),    # D
    (268, 495),    # E
and ends some lines later with
    (168, 639),    # Y
    (497, 496)     # Z
]
The value of the KEY_LOCATIONS constant is a list with 26 elements corresponding to the 26 letters. The element at index 0 corresponds to the letter A, the element at index 1 corresponds to the letter B, and so on. Each of the elements represents a point on the window. For example, the key for A has its center at the point (140, 566). Note that enigma_constants.py also defines a string ALPHABET that is the 26 capital letters in order.
Those definitions are all you need to get the keys displayed on the screen, and you should definitely get this part working before you move on to the next milestone. Of course, it may not be easy to tell whether your program is working because—at least when you’ve done everything right—the keys sit exactly on top of the identical image in the background. The only difference is in the font, so make sure your all your keys have gone from this font

to this font

The version of the program you created at the end of the last milestone does not yet respond to any mouse actions. For this milestone, your job is to implement the mousedown_action and mouseup_action methods in the EnigmaKey class. We want a "mousedown" event to change the color of the label on the key to KEY_DOWN_COLOR, and a "mouseup" event to change the color back to KEY_UP_COLOR. This part of the lab is in some ways just as simple as it sounds. Most of the work has already been done in the enigma_main.py file. If you look back at the code there, you will see that it defines three event listeners—one for each of the "mousedown", "mouseup", and "click" events—and then adds those listeners to the graphics window. The implementation of each of these listeners is almost identical, which means that if you understand one, you will immediately understand the others. The implementation of mousedown_action looks like this:
    def mousedown_action(e):
        gobj = gw.getElementAt(e.getX(), e.getY())
        if gobj is not None:
            if getattr(gobj, "mousedown_action", None) is not None:
                gobj.mousedownAction(enigma)
The mousedown_action function begins by using getElementAt to find the GObject that located at the current mouse position. If there is such an object, the code then uses the built-in getattr method to see if that object includes a method called mousedown_action. If so, the code in the listener defined in enigma_main.py calls that method, passing in the value of enigma, which is the EnigmaMachine object that keeps track of the state of the Enigma machine. If there is no mousedown_action in the object, the event is simply ignored. The advantage of adding these listeners to the main program is that it is now extremely easy to make one of your graphical objects respond to a mouse event. All you need to do is fill in the definition for the mousedown_action method.
Your task in Milestone #2 is therefore to add mousedown_action and mouseup_action methods to the EnigmaKey class. You’ll remove
raise NotImplementedErrorand replace it with code that changes the color of the GLabel stored in the instance variable self.label (GLabel objects have a setColor method). Implementing this entire milestone should take exactly two new lines of code. If you find yourself adding more, you’re probably on the wrong track.
The area above the Enigma keyboard contains 26 lamps organized in the same pattern as the keyboard. The process of creating the lamps is similar to that of creating the keys. enigma_constants.py defines LAMP_LOCATIONS the same way as KEY_LOCATIONS. Copy the code you wrote in the EnigmaMachine constructor and modify it to add EnigmaLamps at the appropriate locations. You should see the font for all the lamps change from this

to this

One important difference from creating the keys is that you should save information about which EnigmaLamp object goes with which letter because you will need it for Milestone #4. A good way to do this is create an instance variable in the EnigmaMachine constructor that stores a dictionary mapping letters to EnigmaLamps. You can initialize the empty dictionary like this
self.lamps = {}Each time you create a lamp and add it to the graphics window, also store an entry in the dictionary with the letter as the key and the EnigmaLamp object as the value. You can check if this worked by printing out self.lamps after you’ve added everything. You should see something like this (entries for 'C' through 'Y' omitted for space; your output won’t have each entry on its own line):
{'A': < enigma_lamp.EnigmaLamp object at 0x00000251825BEFD0 >,
 'B': < enigma_lamp.EnigmaLamp object at 0x00000251825C2208 >,
 ...
'Z': < enigma_lamp.EnigmaLamp object at 0x00000251825CAC88 >}Unlike the keyboard, the lamp panel does not respond to mouse events that occur when you press or click the mouse on one of the lamps. Eventually, you want pressing one of the keys to light the lamp corresponding to the encrypted version of that character after the signal passes through all the encryption rotors. Before you get to that, however, it makes sense to see whether you can extend your program so that pressing one of the keys—in addition to changing the key color—also lights the corresponding lamp. Thus, if you press the A key, for example, you would like the label on the A lamp to appear to glow by changing the text color to the yellowish shade defined by the constant LAMP_ON_COLOR.
Once again, this task may initially seem simple. For Milestone #2, you implemented the mousedown_action for keys so that it changes the key color. Changing the lamp color, however, is slightly more difficult. For keys, the mousedown_action method is defined within the code that creates the key and therefore has access to the label as an instance variable of the object. The code that creates each individual key, however, doesn’t know anything about the lamps. Moreover, if you use good object-oriented design, the keys shouldn’t know anything about the lamps. Working with lamps is the responsibility of the EnigmaMachine class.
The best way to maintain the a clean design is to have the mousedown_action and mouseup_action methods pass along the fact that the user pressed or released a key on the keyboard to the EnigmaMachine object by calling a method on the enigma parameter. If, for example, the EnigmaMachine class defines key_pressed and key_released methods, mousedown_action and mouseup_action in EnigmaKey can call these methods and leave the implementation to the EnigmaMachine class, which is where it belongs. The code for those two EnigmaMachine methods can then call turn_on or turn_off on the appropriate EnigmaLamp object to achieve the desired effect. The dictionary you created in Milestone #3 will come in handy here, as it will allow you to get the EnigmaLamp object that corresponds to the letter parameter.
Speaking of turn_on and turn_off, now is the time to implement them. Fortunately, all they need to do is set the color of the label to LAMP_ON_COLOR and LAMP_OFF_COLOR, respectively.
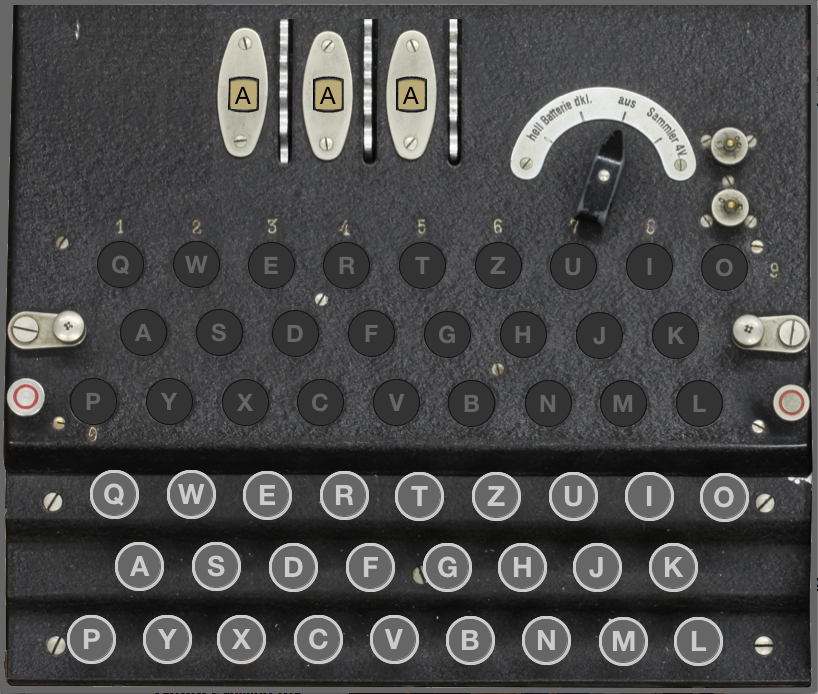
The encryption rotors for the machine are positioned underneath the top of the Enigma panel. The only part of a rotor you can see is the single letter that appears in the window at the top of the Enigma image. For example, in the diagram shown in Figure 1, you see the letters
at the top of the window. The letters visible through the windows are printed along the side of the rotor and mounted underneath the panel so that only one letter is visible at a time for each rotor. Whenever a rotor turns one notch, the next letter in the alphabet appears in the window. The act of moving a rotor into its next position is called advancing the rotor and is discussed in more detail in the description of Milestone #6.
For this milestone, your job is to add code the to EnigmaMachine constructor to add the rotors to the display. As with the keys and lamps, rotors have a visible component, EnigmaRotor, implemented as a GCompound subclass. In this case, the GCompound includes a small GRect colored to match the piece of the rotor visible through the window and a GLabel that shows the letter. As in the earlier structures, a constant called ROTOR_LOCATIONS gives the x and y coordinates of the three rotors, numbering them from left to right. As noted in the Background Handout, the rotor on the left is called the slow rotor, the one in the middle is the medium rotor, and the one on the right is the fast rotor. Also like the previous milestones, you can tell the rotors have been added correctly when the font changes.
One aspect of the EnigmaRotor class that makes it different from EnigmaKey and EnigmaLamp is that in addition to the visible component that appears in the display window, each of the rotors defines a letter-substitution cipher by specifying a permutation of the alphabet in the form of a 26-character string. The permutations for each of the three rotors—which in fact correspond to rotors in the real Enigma—are supplied in the enigma_constants.py file in the form of the following list:
ROTOR_PERMUTATIONS = [
    "EKMFLGDQVZNTOWYHXUSPAIBRCJ",  # Permutation for slow rotor
    "AJDKSIRUXBLHWTMCQGZNPYFVOE",  # Permutation for medium rotor
    "BDFHJLCPRTXVZNYEIWGAKMUSQO"   # Permutation for fast rotor
]
The permutation for the slow rotor, for example, is "EKMFLGDQVZNTOWYHXUSPAIBRCJ", which corresponds to the following character mapping:

At the moment, you don’t have to implement the permutation; you will have a chance to do that in Milestone #7. All you need to know is that EnigmaRotor constructor takes the permutation for the rotor as an argument and stores it as an instance variable. For example, if you’re creating the slow rotor, you have to pass in the string "EKMFLGDQVZNTOWYHXUSPAIBRCJ" to the EnigmaRotor constructor.
You will need to reference the rotor’s permutation and offset instance variables in the EnigmaMachine’s encrypt method, so you should store a list of the EnigmaRotor objects in an instance variable when you create them.
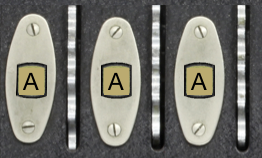
When the German Enigma operator wanted to send a message, the first step in the process was to set the position of the rotors to a particular three-letter setting for that day. The settings for each day were recorded in a codebook, which the British were never able to obtain. For example, if the codebook indicated that the setting of the day were JLY, the operator would manually reposition the rotors so that they looked like this:
In the Enigma simulator, you enter the day setting by clicking on the rotors. Each mouse click advances the rotor by one position. To enter the setting JLY , for example, you would click 9 times on the slow rotor, 11 times on the medium rotor, and 24 times on the fast rotor.
Implementing the click operation to advance the rotor requires just a few changes. A click_action method has already been implemented for the EnigmaRotor class, which will be called when the click occurs. The body of the click_action method is a single line that calls the advance method to advance the rotor on which the click occurred.
Your task is to fill in the definition of the advance method. This method should do two things: 1. Increment the rotor’s offset 2. Changes the displayed letter to correspond to the new offset
The offset represents the number of positions the rotor has advanced. When the offset is 0 (as it is for all rotors in Milestone #5), the letter in the display is A. When the rotor advances one position, the offset changes to 1 and the letter in the display changes to B. Advancing a rotor is just rotating a circle, so it will eventually come back around to the start. If the offset is 25, which means that the display shows the letter Z, advancing the rotor changes the offset back to 0 and displays the letter A.
You should use the setLabel method to change the text displayed by the rotor’s label instance variable.
So far in this assignment, you’ve implemented lots of graphics and worked on the underlying classes, but haven’t as yet done any encryption. Since Milestone #4, your program has responded to pressing the letter Q by lighting the lamp for the letter Q . Had the Germans used a machine that simple, the codebreakers could have all gone home.
The Enigma machine encrypts a letter by passing it through the rotors, each of which implements a simple letter-substitution cipher. Instead of trying to get the entire encryption path working at once, it makes much more sense to trace the current through just one step of the Enigma encryption. For example, suppose that the rotor setting is AAA and the Enigma operator presses the letter Q . Current flows from right to left across the fast rotor, as shown in Figure @fig#onestage.
The wiring inside the fast rotor maps that current to the letter I, which you can determine immediately from the permutation for the fast rotor, which looks like this:

So far, so good. The process of translating a letter, however, is not quite so simple because the rotor may not be in its initial position. What happens if the offset is not 0?
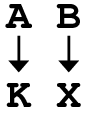
If the offset of the fast rotor were 1 instead of 0, the encryption would use the wiring for the next letter in the alphabet. Thus, instead of using the straightforward translation of Q to I , the program would need somehow to apply the transformation implied by the next position in the permutation, which shows that R translates to W.
Focusing on the letters, however, is likely to get you confused. The problem is that the positions of the letters on each end of the rotor chain are fixed. After all, the lamps and keys don’t move. What happens instead is that the rotor connections move underneath the letters. It is therefore more accurate to view the transformation implemented by the fast rotor in the following form:

When the rotor advances, the letters maintain their positions, but every wire rotates one position to the left with respect to the top and bottom connections. After advancing one notch, the rotor looks like this:

The change in the wiring is easiest to see in the straight line that connects N to N in the original state. After advancing, this wire connects M to M. If you press the Q key again in this new configuration, it shows up on the other side of the rotor as V:

What’s happening in this example is that the translation after advancing the rotor is using the wire that connects R to W in the initial rotor position. After advancing, that wire connects Q and V, each of which appears one letter earlier in the alphabet. If the rotor has advanced k times, the translation will use the wire k steps ahead of the letter you’re translating. Similarly, the letter in that position of the permutation string shows the letter k steps ahead of the letter you want. You therefore have to add the offset of the rotor to the index of the letter before calculating the permutation and, after doing so, subtract the offset from the index of the character you get. In each case, you need to remember that the process of addition and subtraction may wrap around the end of the alphabet. You therefore need to account for this possibility in the code. The modulo (%) operator will come in very handy here.
The strategy expressed in the preceding paragraph can be translated into the following pseudocode method, which you should implement in the apply_permutation function in enigma_rotor.py:
def apply_permutation(letter, permutation, offset):
    # compute the alphabetic index of the letter and add the offset to it, wrapping around if necessary
    # look up the character at that index in the permutation string
    # compute the alphabetic index of the character from the permutation string
    # return the character corresponding to this index after subtracting the offset, wrapping if necessary
Note that you can use ALPHABET.index(letter) to get the index of letter within the string ALPHABET (defined in enigma_constants.py), which can also serve as the index for the purposes of applying a permutation. If you implement apply_permutation and use it (with the permutation and offset from the fast rotor) in selecting the lamp to turn on and off in the key_pressed and key_released methods in EnigmaMachine, your simulation should implement this first stage. Pressing the Q key when the rotor setting is AAA should light up the lamp for the letter I. If you click on the fast rotor to advance the rotor setting to AAB, clicking Q again should light the lamp for the letter V.
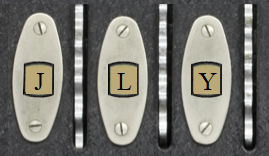
Once you have completed Milestone #7 (and, in particular, once you have implemented a working version of apply_permutation), you’re ready to tackle the complete Enigma encryption path. Pressing a key on the Enigma keyboard sends a current from right to left through the fast rotor, through the middle rotor, and through the slow rotor. From there, the current enters the reflector, which implements the following fixed permutation for which the offset is always 0:
REFLECTOR_PERMUTATION = "IXUHFEZDAOMTKQJWNSRLCYPBVG"When the current leaves the reflector, it makes its way backward from left to right, starting with the slow rotor, moving on to the medium rotor, and finally passing through the fast rotor to arrive at one of the lamps. The complete path that arises from pressing Q is illustrated in Figure 3. As you can see from the diagram, the current flows through the fast rotor from right to left to arrive at I (index 8), through the medium rotor to arrive at X (index 23), and through the slow rotor to arrive at R (index 17). It then makes a quick loop through the reflector and emerges at S (index 18). From there, the current makes its way backward through the slow rotor straight across to S (index 18), through the medium rotor to E (index 4) and finally landing at P (index 15).
If everything is working from your previous milestones, making your way through the rotors and the reflector should not be too difficult. The challenge comes when you need to move backward through the rotors. The permutation strings show how the letters are transformed when you move through a rotor from right to left. When the signal is running from left to right, however, you can’t use the permutation strings directly because the translation has to happen “backwards.” What you need is the inverse of the original permutation.
The idea of inverting a key is most easily illustrated by example. Suppose, that the encryption key is "QWERTYUIOPASDFGHJKLZXCVBNM". That key represents the following translation table:

The translation table shows that A maps into Q, B maps into W, C maps into E, and so on. To turn the encryption process around, you have to read the translation table from bottom to top, looking to see what plaintext letter gives rise to each possible letter in the ciphertext (in cryptography terms, plaintext means the original document, and ciphertext means the encrypted version). For example, if you look for the letter A in the ciphertext, you discover that the corresponding letter in the plaintext must have been K. Similarly, the only way to get a B in the ciphertext is to start with an X in the original message. The first two entries in the inverted translation table therefore look like this:
If you continue this process by finding each letter of the alphabet on the bottom of the original translation table and then looking to see what letter appears on top, you will eventually complete the inverted table, as follows:

The inverted key is simply the 26-letter string on the bottom row, which in this case is "KXVMCNOPHQRSZYIJADLEGWBUFT".
To complete this milestone, you need to implement the function invert_permutation in enigma_rotor.py. In the EnigmaRotor constructor, you need to call invert_permutation so that each rotor has an instance variable for both a right-to-left and a left-to-right version of the permutation. The offset applies to each of these permutations in exactly the same way.
The final step in the creation of the Enigma simulator is to implement the feature that advances the fast rotor every time a key is pressed. Although some sources (and most of the movies) suggest that the fast rotor advances after the key is pressed, watching the Enigma machine work makes it clear that it is the force of the key press that advances the rotor. Thus, the fast rotor advances before the translation occurs. When the fast rotor has made a complete revolution, the medium rotor advances. Similarly, when the medium rotor makes a complete revolution, the slow rotor advances.
Given that you already have a method to advance a rotor and code in EnigmaMachine that responds to a key being pressed, the only new capability you need to implement is the “carry” from one rotor to the next. A useful technique to get this process working is to change the definition of advance so that it returns a Boolean: False in the usual case when no carry occurs, and True when the offset for that rotor wraps back to 0. The function that calls advance can check this result to determine whether it needs to propagate the carry to the next rotor.
If you want to push this lab further, here are some possible extensions to consider doing just for fun:
Submit the following files via the Lab 7 Moodle page.
Four Python files: enigma_machine.py, enigma_key.py, enigma_lamp.py, and enigma_rotor.py
If you implemented any EXTRA FUN extensions that involved modifying enigma_main.py, submit that as well, along with a text file extensions.txt describing what you did
This assignment is graded out of 30 points as follows:
CHALLNENGES:
We will assess each Milestone by running your enigma_main.py and testing that the functionality specified in that Milestone is working correctly. Note that the milestones are structured to give you flexibility in terms of how much time you spend on this lab. Completing through Milestone #6 will earn 83% (25/30), and through Milestone #7 will earn 95% (28.5/30). Make the choice that’s right for you.
Acknowledgments: this lab adapted from Eric Robert’s Enigma Machine lab.
PGL was created by Eric Roberts and Keith Schwarz at Stanford University (see citation below). Python implementation (v0.89) and the associated documentation retrieved from Roberts’ Spring 2020 offering of CSCI 121 at Reed College
Roberts, Eric, and Keith Schwarz. “A portable graphics library for introductory CS.” Proceedings of the 18th ACM conference on Innovation and technology in computer science education. ACM, 2013.↩︎